Search This Blog

Monday, June 4, 2012

Starting and Stopping Oracle Enterprise Manager 11g Grid Control

This document will detail the steps required to stop and start Oracle Enterprise Manager 11g Grid Control and all its components. For information on installing Oracle Enterprise Manager 11g Grid Control see the post Install Oracle Enterprise Manager Grid Control 11gR1 on Linux.
In this document I will be making references to the OMS_HOME and AGENT_HOME. If you do not happen to know what those locations are you can find them in the /etc/oratab file.
[oracle@gc bin]$ grep -E 'oms|agent' /etc/oratab
*:/u02/app/oracle/product/weblogic/oms11g:N
*:/u02/app/oracle/product/weblogic/agent11g:N
[oracle@gc bin]$
So in this example the OMS_HOME would be /u02/app/oracle/product/weblogic/oms11g and AGENT_HOME would be/u02/app/oracle/product/weblogic/agent11g.
NOTE: The Oracle Enterprise Manger 11g Grid Control install process puts a script called gcstartup in /etc/init.dthat will stop and start the Oracle Management Service and Agent on OS startup/shutdown. It does not start or stop the repository database. If you would like to stop the automated startup/shutdown of Grid Control services place comments in front of the OMS and AGENT home directories in the /etc/oratab file or remove the script /etc/init.d/gcstartup.
Stopping Oracle Enterprise Manager 11g Grid Control
Stop the Oracle Management Service
From the OMS_HOME directory run the following to stop the OMS and WebTier services.
OMS_HOME/bin/emctl stop oms –all

[oracle@gc ~]$ /u02/app/oracle/product/weblogic/oms11g/bin/emctl stop oms -all
Oracle Enterprise Manager 11g Release 1 Grid Control
Copyright (c) 1996, 2010 Oracle Corporation.  All rights reserved.
Stopping WebTier...
WebTier Successfully Stopped
Stopping Oracle Management Server...
Oracle Management Server Successfully Stopped
Oracle Management Server is Down
[oracle@gc ~]$
Note if you do not include the –all flag the HTTP services for the WebLogic Server will not be shutdown.
Stop the Oracle Management Agent
From the AGENT_HOME directory run the following to stop the Agent.
AGENT_HOME/bin/emctl stop agent

[oracle@gc ~]$ /u02/app/oracle/product/weblogic/agent11g/bin/emctl stop agent
Oracle Enterprise Manager 11g Release 1 Grid Control 11.1.0.1.0
Copyright (c) 1996, 2010 Oracle Corporation.  All rights reserved.
Stopping agent ... stopped.
[oracle@gc ~]$
Stop the repository database
[oracle@gc ~]$ sqlplus / as sysdba

SQL*Plus: Release 11.2.0.1.0 Production on Tue May 11 11:41:21 2010

Copyright (c) 1982, 2009, Oracle.  All rights reserved.

Connected to:
Oracle Database 11g Enterprise Edition Release 11.2.0.1.0 - Production
With the Partitioning, OLAP, Data Mining and Real Application Testing options

SQL> shutdown immediate
Database closed.
Database dismounted.
ORACLE instance shut down.
SQL> exit
Disconnected from Oracle Database 11g Enterprise Edition Release 11.2.0.1.0 - Production
With the Partitioning, OLAP, Data Mining and Real Application Testing options
[oracle@gc ~]$
Stop the Listener
[oracle@gc ~]$ lsnrctl stop

LSNRCTL for Linux: Version 11.2.0.1.0 - Production on 11-MAY-2010 11:42:03

Copyright (c) 1991, 2009, Oracle.  All rights reserved.

Connecting to (DESCRIPTION=(ADDRESS=(PROTOCOL=TCP)(HOST=gc)(PORT=1521)))
The command completed successfully
[oracle@gc ~]$
That is it. Oracle Enterprise Manager 11g Grid Control and all associated services are now shutdown.

Starting Oracle Enterprise Manager 11g Grid Control
Start the Listener
[oracle@gc ~]$ lsnrctl start

LSNRCTL for Linux: Version 11.2.0.1.0 - Production on 11-MAY-2010 12:58:01

Copyright (c) 1991, 2009, Oracle.  All rights reserved.

Starting /u02/app/oracle/product/11.2.0/dbhome_1/bin/tnslsnr: please wait...

TNSLSNR for Linux: Version 11.2.0.1.0 - Production
System parameter file is /u02/app/oracle/product/11.2.0/dbhome_1/network/admin/listener.ora
Log messages written to /u02/app/oracle/diag/tnslsnr/gc/listener/alert/log.xml
Listening on: (DESCRIPTION=(ADDRESS=(PROTOCOL=tcp)(HOST=gc.localdomain)(PORT=1521)))

Connecting to (DESCRIPTION=(ADDRESS=(PROTOCOL=TCP)(HOST=gc)(PORT=1521)))
STATUS of the LISTENER
------------------------
Alias                     LISTENER
Version                   TNSLSNR for Linux: Version 11.2.0.1.0 - Production
Start Date                11-MAY-2010 12:58:01
Uptime                    0 days 0 hr. 0 min. 0 sec
Trace Level               off
Security                  ON: Local OS Authentication
SNMP                      OFF
Listener Parameter File   /u02/app/oracle/product/11.2.0/dbhome_1/network/admin/listener.ora
Listener Log File         /u02/app/oracle/diag/tnslsnr/gc/listener/alert/log.xml
Listening Endpoints Summary...
  (DESCRIPTION=(ADDRESS=(PROTOCOL=tcp)(HOST=gc.localdomain)(PORT=1521)))
The listener supports no services
The command completed successfully
[oracle@gc ~]$
Start the repository database
[oracle@gc ~]$ sqlplus / as sysdba

SQL*Plus: Release 11.2.0.1.0 Production on Tue May 11 12:58:49 2010

Copyright (c) 1982, 2009, Oracle.  All rights reserved.

Connected to an idle instance.

SQL> startup
ORACLE instance started.

Total System Global Area 1272213504 bytes
Fixed Size                  1336260 bytes
Variable Size             805309500 bytes
Database Buffers          452984832 bytes
Redo Buffers               12582912 bytes
Database mounted.
Database opened.
SQL> exit
Disconnected from Oracle Database 11g Enterprise Edition Release 11.2.0.1.0 - Production
With the Partitioning, OLAP, Data Mining and Real Application Testing options
[oracle@gc ~]$
Start the Oracle Management Service
From the OMS_HOME directory run the following to start the OMS and WebTier services
OMS_HOME/bin/emctl start oms

[oracle@gc ~]$ /u02/app/oracle/product/weblogic/oms11g/bin/emctl start oms
Oracle Enterprise Manager 11g Release 1 Grid Control
Copyright (c) 1996, 2010 Oracle Corporation.  All rights reserved.
Starting WebTier...
WebTier Successfully Started
Starting Oracle Management Server...
Oracle Management Server Successfully Started
Oracle Management Server is Up
[oracle@gc ~]$
Start the Oracle Management Agent
From the AGENT_HOME directory run the following to start the Agent.
AGENT_HOME/bin/emctl start agent

[oracle@gc ~]$ /u02/app/oracle/product/weblogic/agent11g/bin/emctl start agent
Oracle Enterprise Manager 11g Release 1 Grid Control 11.1.0.1.0
Copyright (c) 1996, 2010 Oracle Corporation.  All rights reserved.
Starting agent ........ started.
[oracle@gc ~]$
Enterprise Manager 11g Grid Control and all associated services and can be accessed at https://servername.domain:7799/em.

Sunday, May 6, 2012

How to remove Agent/targets from Grid Control neatly


I was given the task to remove the target host/agents and other listed targets of Server1 from Oracle grid control. At first I thought it was very easy and I was definitely correct. Here’s what happened:
From OEM Grid Control I clicked on targets and selected the Server1 from the list. Then from its homepage I clicked on the the targets and then I eventually select all the targets except of course from the agent. Note: (the management agent of server1 must be running to do this). The targets were successfully deleted and now the only thing left is the host and the agent of Server1.
To remove the agent and host form the list, I stop the management agent of server1 then I went back to my OEM Grid control to remove the host Server1. Now there comes the challenge, No matter how many times I tried to delete the host Server1 from oem grid control It seems like the page is just running and nothing happens. No matter how long I’ve waited the host Server1 still remains on the list.
Now to clean it manually, I connect to the OEM Grid Repository and perform the following:
SQL> select target_name from mgmt_targets where target_type=’oracle_emd’;
This command show me the list of all the registered targets from my OEM and I can see that Server1 is still there. Then to manually remove Server1 from the list, I then execute:
SQL> exec mgmt_admin.cleanup_agent(‘Server1:3872′);
It will take a while at least 3 to 5 mins the most. Once it was completed  I quickly checked my OEM Grid Control Target List and voila!!! Server1 was successfully removed from the target list together with its agent.
Thanks to Metalink Note:454081.1 and to Luis Cardenas post (http://www.lazydba.com/oracle/0__146127.html)  who gave me the idea to solve my problem.

Friday, April 20, 2012

Mount Windows folder on Linux

Sometimes, we need to mount a Windows folder on Linux. In order to do it, let’s follow these steps:
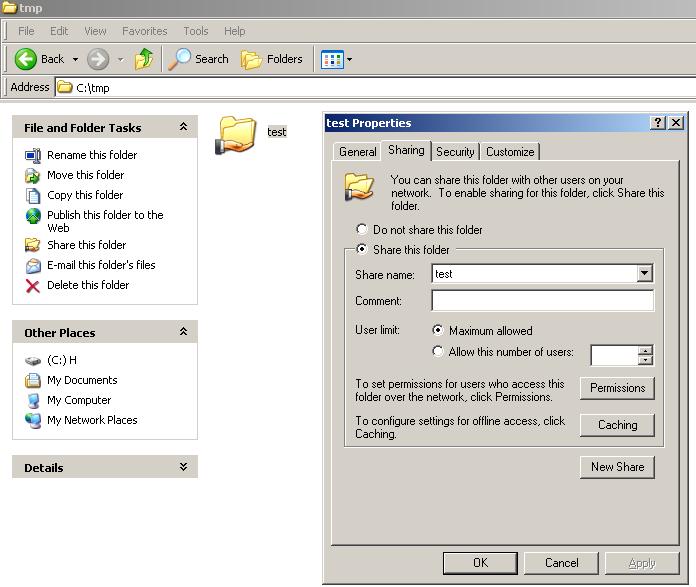
1. Create a directory in Windows, share it and give full permission:
mount_1
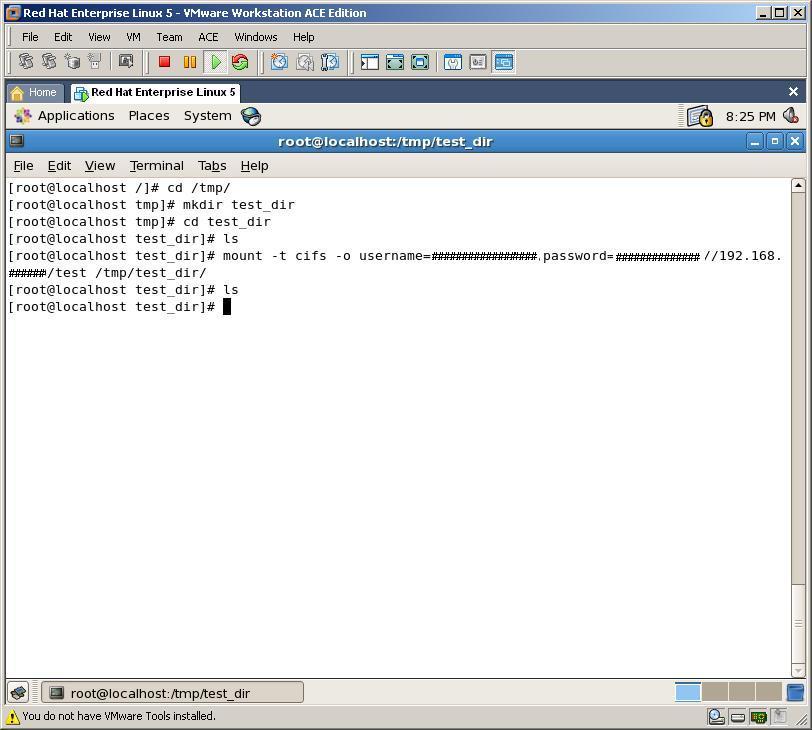
2. Create new directory in /tmp directory on Linux, name it to “test_dir” and mount shared Windows directory into that directory by running below code:
mount -t cifs -o username=#####,password=###### //192.168.##.##/test   /tmp/test_dir
mount_23
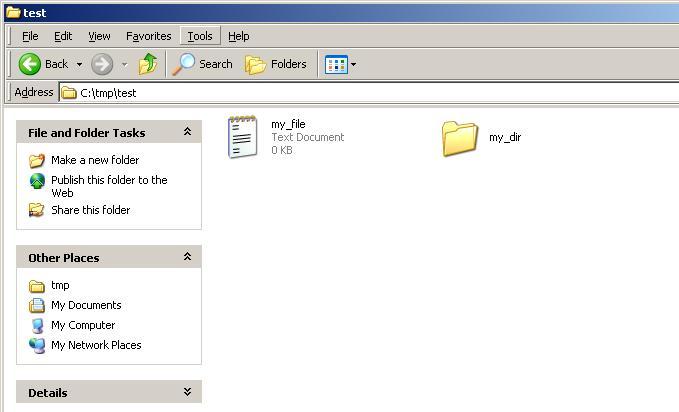
3. Now, by creating new file and folder in Windows directory, we can get them from Linux box. Let’s create a file and a directory in Windows folder
mount_3
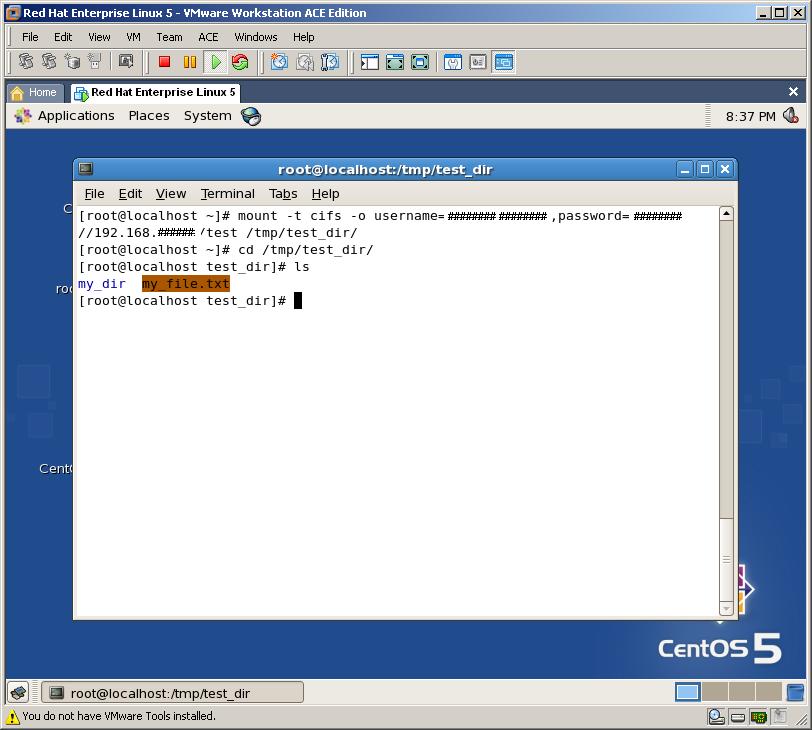
4. At last, let’s check it from Linux, whether we can see the file and the directory or not
mount_4
As you can see, we can mount any Windows folder in Linux with very easy steps

Thursday, March 22, 2012

ORA-24005: must use DBMS_AQADM.DROP_QUEUE_TABLE to drop queue tables

ORA-24005: must use DBMS_AQADM.DROP_QUEUE_TABLE to drop queue tables .
Scenario
I was getting this error when I was trying to drop a schema.
Sql> drop user test cascade;
ERROR at line 1:
ORA-00604: error occurred at recursive SQL level 1
ORA-24005: must use DBMS_AQADM.DROP_QUEUE_TABLE to drop queue tables
Logged in as Test user and checked for queue tables .
SQL> select * from user_queue_tables;
no rows selected

SQL> select OWNER, NAME, QUEUE_TABLE, ENQUEUE_ENABLED, DEQUEUE_ENABLED
from DBA_QUEUES where OWNER='TEST';
 no rows selected
However I was able to locate few queue tables in the schema when I used 
Sql> select table_name from user_tables;
Got few Tables starting with AQ$_ *******
Tried to delete these tables using the DBMS_AQADM.DROP_QUEUE_TABLE procedure . However ended with the following error message .
SQL> begin
  2  DBMS_AQADM.DROP_QUEUE_TABLE(‘AQ$_test');
  3  end;
  4
  5  /
begin
*
ERROR at line 1:
ORA-24002: QUEUE_TABLE SCOTT.AQ$_test does not exist
ORA-06512: at "SYS.DBMS_AQADM_SYS", line 4084
ORA-06512: at "SYS.DBMS_AQADM", line 197
ORA-06512: at line 2

Working solution :
Logged in as sys and issued the following command :
alter session set events '10851 trace name context forever, level 2';
and then dropped all the AQ$.*****  tables from sys successfully.
Finally dropped the particular schema .
Issue resolved 

Friday, March 16, 2012

Linux shell script date formatting

Linux date FAQ: How do I create a formatted date in Linux? (Most likely, "How do I create a formatted date I can use in a Linux shell script?")
I just ran into a case where I needed to create a formatted date in a Linux shell script, where the date format looks like this:
2010-07-11
To create this formatted date string, I just used the Linux date command, using the "+" sign to specify that I want to use the date formatting option, like this:
thedate=`date +"%Y-%m-%d"`
The Linux date command shown in this line of code creates the date string in the format I want, and then I save the date output to a Linux shell script variable named "thedate".
This just shows one possible way to format a date in a Linux shell script. Of course you can use '-', '.', and many other characters as date field separators, or use no characters at all.

More Linux date formatting information

For more information on other Linux date formatting options (there are many more date formatting options), take a look at the man page for the date command on your Linux system, like this:
man date
When I run that command on a CentOS Linux system, it shows these date formatting operators:
%%     a literal %
%a     locale’s abbreviated weekday name (e.g., Sun)
%A     locale’s full weekday name (e.g., Sunday)
%b     locale’s abbreviated month name (e.g., Jan)
%B     locale’s full month name (e.g., January)
%c     locale’s date and time (e.g., Thu Mar  3 23:05:25 2005)
%C     century; like %Y, except omit last two digits (e.g., 21)
%d     day of month (e.g, 01)
%D     date; same as %m/%d/%y
%e     day of month, space padded; same as %_d
%F     full date; same as %Y-%m-%d
%g     last two digits of year of ISO week number (see %G)
%G     year of ISO week number (see %V); normally useful only with %V
%h     same as %b
%H     hour (00..23)
%I     hour (01..12)
%j     day of year (001..366)
%k     hour ( 0..23)
%l     hour ( 1..12)
%m     month (01..12)
%M     minute (00..59)
%n     a newline
%N     nanoseconds (000000000..999999999)
%p     locale’s equivalent of either AM or PM; blank if not known
%P     like %p, but lower case
%r     locale’s 12-hour clock time (e.g., 11:11:04 PM)
%R     24-hour hour and minute; same as %H:%M
%s     seconds since 1970-01-01 00:00:00 UTC
%S     second (00..60)
%t     a tab
%T     time; same as %H:%M:%S
%u     day of week (1..7); 1 is Monday
%U     week number of year, with Sunday as first day of week (00..53)
%V     ISO week number, with Monday as first day of week (01..53)
%w     day of week (0..6); 0 is Sunday
%W     week number of year, with Monday as first day of week (00..53)
%x     locale’s date representation (e.g., 12/31/99)
%X     locale’s time representation (e.g., 23:13:48)
%y     last two digits of year (00..99)
%Y     year
%z     +hhmm numeric timezone (e.g., -0400)
%:z    +hh:mm numeric timezone (e.g., -04:00)
%::z   +hh:mm:ss numeric time zone (e.g., -04:00:00)
%:::z  numeric time zone with : to necessary precision (e.g., -04, +05:30)
%Z     alphabetic time zone abbreviation (e.g., EDT)

Because Unix and Linux systems are very consistent in this area, you  should be able to write a date formatting command on one Unix or Linux  system, and use that same command on another Unix system.

Monday, February 27, 2012

Script to Check Physical Standby in Sync with the Primary

http://shrikantrao.wordpress.com/2011/08/03/script-to-check-physical-standby-in-sync-with-the-primary/
https://support.oracle.com/CSP/main/article?cmd=show&type=NOT&doctype=HOWTO&id=861595.1

A simple script, on single click will provide us the status of DR sync with primary database.

Script 1) .bat file

sqlplus "sys/sys@prod as sysdba" @E:\DRSTATUS\onproduction.sql
sqlplus "sys/sys@standby as sysdba" @E:\DRSTATUS\onstandby.sql >> E:\cloverdba1_Clover_report\DRSTATUS\drsysn.out

I am appending the second output (for standby) to the same file. So that the output for both will be displayed in a single .out file.

Script 2) onproduction.sql file (On Primary)

set time on
set lines 200

spool E:\DRSTATUS\drsysn.out

prompt +++++++++++LAST PRODUCTION SEQUENCE GENERATED++++++++++++++++++

select to_char(sysdate,'dd-mon-yyyy hh24:mi:ss') Date from dual;
SELECT distinct SEQUENCE# "Last Sequence Generated", THREAD# "Thread"
FROM V$ARCHIVED_LOG
WHERE (THREAD#,FIRST_TIME ) IN (SELECT THREAD#,MAX(FIRST_TIME) FROM V$ARCHIVED_LOG GROUP BY THREAD#)
ORDER BY 1;

spool off
exit

Script 3) onstandby.sql file (On Physical Standby)

set time on
set lines 200

prompt ++++++++++++++++++++LAST SEQUENCE RECIEVED FROM PRODUCTION and APPLIED ON STANDBY+++++++++++++++++++++++++

SELECT ARCH.THREAD# "Thread", ARCH.SEQUENCE# "Last Sequence Received", APPL.SEQUENCE# "Last Sequence Applied", (ARCH.SEQUENCE# - APPL.SEQUENCE#) "Difference"
FROM
(SELECT THREAD# ,SEQUENCE# FROM V$ARCHIVED_LOG WHERE (THREAD#,FIRST_TIME ) IN (SELECT THREAD#,MAX(FIRST_TIME) FROM V$ARCHIVED_LOG GROUP BY THREAD#)) ARCH,
(SELECT THREAD# ,SEQUENCE# FROM V$LOG_HISTORY WHERE (THREAD#,FIRST_TIME ) IN (SELECT THREAD#,MAX(FIRST_TIME) FROM V$LOG_HISTORY GROUP BY THREAD#)) APPL
WHERE
ARCH.THREAD# = APPL.THREAD#
;

prompt ++++++++++++++++++++CHECK FOR GAP AT STANDBY+++++++++++++++++++++++++

SELECT THREAD#, LOW_SEQUENCE#, HIGH_SEQUENCE# FROM V$ARCHIVE_GAP;
exit

Explanation:

1. To check availability of redo on standby. This can be done, by checking the output of “last Sequence Generated” in script 2(at primary) with “Last Sequence Received” in script 3(at standby). If the value differs that shows the archive is missing on standby.
2. To Check for redo applied on standby. The column “difference” in script 3(at standby) should be 0. This specifies that the primary is in sync with physical standby.
3. Second query of 3rd script will provide detail on archive gap, which redo is still missing at standby.

To demo the archive lag, I have cancelled managed recovery. This will show the number of lag in “difference” column (7 in my case). The Output file will be displayed as,

+++++++++++LAST PRODUCTION SEQUENCE GENERATED++++++++++++++++++

TO_CHAR(SYSDATE,'DD-MON-YYYYH
---------------------------------------------------------------------------
02-aug-2011 19:03:58

Elapsed: 00:00:00.00

Last Sequence Generated Thread
----------------------- ----------
582535 1

Elapsed: 00:00:00.09

SQL*Plus: Release 9.2.0.1.0 - Production on Tue Aug 2 19:08:05 2011

Copyright (c) 1982, 2002, Oracle Corporation. All rights reserved.

Connected to:
Oracle9i Enterprise Edition Release 9.2.0.8.0 - 64bit Production
With the Partitioning, OLAP and Oracle Data Mining options
JServer Release 9.2.0.8.0 - Production

++++++++++++++++++++LAST SEQUENCE RECEIVED FROM PRODUCTION and APPLIED ON STANDBY+++++++++++++++++++++++++

Thread Last Sequence Received Last Sequence Applied Difference
---------- ---------------------- --------------------- ----------
1 582535 582528 7

Elapsed: 00:00:02.01
++++++++++++++++++++CHECK FOR GAP AT STANDBY+++++++++++++++++++++++++

no rows selected

Elapsed: 00:00:34.06
Disconnected from Oracle9i Enterprise Edition Release 9.2.0.8.0 - 64bit Production
With the Partitioning, OLAP and Oracle Data Mining options
JServer Release 9.2.0.8.0 - Production

Ref: How To Check Whether Physical Standby is in Sync with the Primary? [ID 861595.1]

I found out a nice shell script while googling, would like to share,

#
# Script to check if standby database is in sync and in read only with apply mode
#
# Purpose script:
# This script checks if standby and primary are in sync and if standby is in mode "READ ONLY WITH APPLY"
# violations will be mailed to recepients defined in this script.
#
# Usage script:
# Place this script on the standby database server in /home/oracle/scripts
# The following changes will be necessary when implementing this script
# 1: CONNECTRSTR refers to the connectstring to connect to the primary db from the standby db
# 2: ORACLE_SID referts to the oracle SID of the standby database
# 3: ORACLE_HOME refers to the oracle HOME of the standby database
#

#!/usr/bin/ksh
. /etc/profile

DBSID=PROD # Database sid
CONNECTSTR=scott/tiger@PROD # Connect string prod
MAILADR=scott.tiger@everywhere.com # mail
NIETERG=2 # allowed difference between standby log and primary log sequence#

# set the environment to the standby database
export ORACLE_SID=PROD
export ORACLE_HOME=/u01/app/oracle/product/11.2.0/db_1

# declare functions to query v$archived_log and other checks

runsqlstb()
{
sqlplus -S << TOTZOVER / as sysdba set heading off select max(sequence#) from v\$archived_log where applied='YES' and dest_id=2 ; exit TOTZOVER } runsqlprd() { sqlplus -S ${CONNECTSTR} <> mailtempl
echo logseq ${DBSID} standby database is $NUMBERSTB >> mailtempl
echo
mailx -s "Standby database out of sync " ${MAILADR} mailtempl
mailx -s "Fout in script " ${MAILADR} mailtempl
errtrap
fi

NUMBERPRD=`runsqlprd`
if [ $? -ne 0 ]
then
echo Something wrong with ${DBSID} > mailtempl
errtrap
fi

echo standby database is ${NUMBERSTB}
echo productie database is ${NUMBERPRD}

VERSCHIL=`expr ${NUMBERPRD} - ${NUMBERSTB}`
echo Standby is $VERSCHIL sequence achter
mailme

Advertisement

Wednesday, December 7, 2011

HOWTO reset root password in linux redhat

Today when i trying to connect to our development database on linux server with root user, but i forget the correct password. :) because i was logging after a 10 months. after that i need to reset root password and this is the following step.

linux machine :
Red Hat Enterprise Linux AS release 4 (Nahant Update 3)
and grub loader.


step.
1. reboot machine
2. wait for GRUB splash screen appear
3. then click on "e" keyword in keyboard (hit enter)
4. after that another window will open again click on "e" keyword in keyword to select "KERNAL ... " from list of value. (hit enter)
5. then type "single" included space (hit enter)
6. then type "b" from keyboard to boot (hit enter)
7. system boot up as single user mode
8. you will see # prompt , here type "passwd" command to change root password
9. reboot
10. enjoy to logging with new user


Related Posts with Thumbnails