In this article I'll describe the installation of Oracle Database 10g Release 2 (10.2.0.1) on Red Hat Enterprise Linux 5 (RHEL5). The article is based on a server installation similar to this, with a minimum of 2G swap, secure Linux disabled and the following package groups installed:
- GNOME Desktop Environment
- Editors
- Graphical Internet
- Text-based Internet
- Development Libraries
- Development Tools
- Legacy Software Development
- Server Configuration Tools
- Administration Tools
- Base
- Legacy Software Support
- System Tools
- X Window System
- Download Software
- Unpack Files
- Hosts File
- Set Kernel Parameters
- Setup
- Installation
- Post Installation
Download Software
Download the following software:Unpack Files
Unzip the files:You should now have a single directory containing installation files. Depending on the age of the download this may either be named "db/Disk1" or "database".unzip 10201_database_linux32.zip
Hosts File
The /etc/hosts file must contain a fully qualified name for the server:<ip-address> <fully-qualified-machine-name> <machine-name>
Set Kernel Parameters
Add the following lines to the /etc/sysctl.conf file:Run the following command to change the current kernel parameters:#kernel.shmall = 2097152 #kernel.shmmax = 2147483648 kernel.shmmni = 4096 # semaphores: semmsl, semmns, semopm, semmni kernel.sem = 250 32000 100 128 #fs.file-max = 65536 net.ipv4.ip_local_port_range = 1024 65000 net.core.rmem_default=262144 net.core.rmem_max=262144 net.core.wmem_default=262144 net.core.wmem_max=262144
Add the following lines to the /etc/security/limits.conf file:/sbin/sysctl -p
Add the following line to the /etc/pam.d/login file, if it does not already exist:* soft nproc 2047 * hard nproc 16384 * soft nofile 1024 * hard nofile 65536
Disable secure linux by editing the /etc/selinux/config file, making sure the SELINUX flag is set as follows:session required pam_limits.so
Alternatively, this alteration can be done using the GUI tool (System > Administration > Security Level and Firewall). Click on the SELinux tab and disable the feature.SELINUX=disabled
Setup
Install the following packages:Create the new groups and users:# From RedHat AS5 Disk 1 cd /media/cdrom/Server rpm -Uvh setarch-2* rpm -Uvh make-3* rpm -Uvh glibc-2* rpm -Uvh libaio-0* cd / eject # From RedHat AS5 Disk 2 cd /media/cdrom/Server rpm -Uvh compat-libstdc++-33-3* rpm -Uvh compat-gcc-34-3* rpm -Uvh compat-gcc-34-c++-3* rpm -Uvh gcc-4* rpm -Uvh libXp-1* cd / eject # From RedHat AS5 Disk 3 cd /media/cdrom/Server rpm -Uvh openmotif-2* rpm -Uvh compat-db-4* cd / eject
Create the directories in which the Oracle software will be installed:groupadd oinstall groupadd dba groupadd oper useradd -g oinstall -G dba,oper oracle passwd oracle
Login as root and issue the following command:mkdir -p /u01/app/oracle/product/10.2.0/db_1 chown -R oracle.oinstall /u01
Edit the /etc/redhat-release file replacing the current release information (Red Hat Enterprise Linux Server release 5 (Tikanga)) with the following:xhost +
Login as the oracle user and add the following lines at the end of the .bash_profile file:redhat-4
# Oracle Settings
TMP=/tmp; export TMP
TMPDIR=$TMP; export TMPDIR
ORACLE_BASE=/u01/app/oracle; export ORACLE_BASE
ORACLE_HOME=$ORACLE_BASE/product/10.2.0/db_1; export ORACLE_HOME
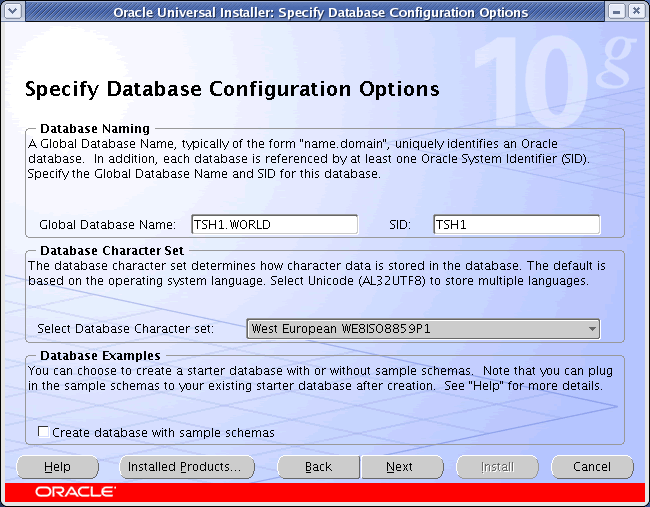
ORACLE_SID=TSH1; export ORACLE_SID
ORACLE_TERM=xterm; export ORACLE_TERM
PATH=/usr/sbin:$PATH; export PATH
PATH=$ORACLE_HOME/bin:$PATH; export PATH
LD_LIBRARY_PATH=$ORACLE_HOME/lib:/lib:/usr/lib; export LD_LIBRARY_PATH
CLASSPATH=$ORACLE_HOME/JRE:$ORACLE_HOME/jlib:$ORACLE_HOME/rdbms/jlib; export CLASSPATH
if [ $USER = "oracle" ]; then
if [ $SHELL = "/bin/ksh" ]; then
ulimit -p 16384
ulimit -n 65536
else
ulimit -u 16384 -n 65536
fi
fiInstallation
Log into the oracle user. If you are using X emulation then set the DISPLAY environmental variable:Start the Oracle Universal Installer (OUI) by issuing the following command in the database directory:DISPLAY=:0.0; export DISPLAY
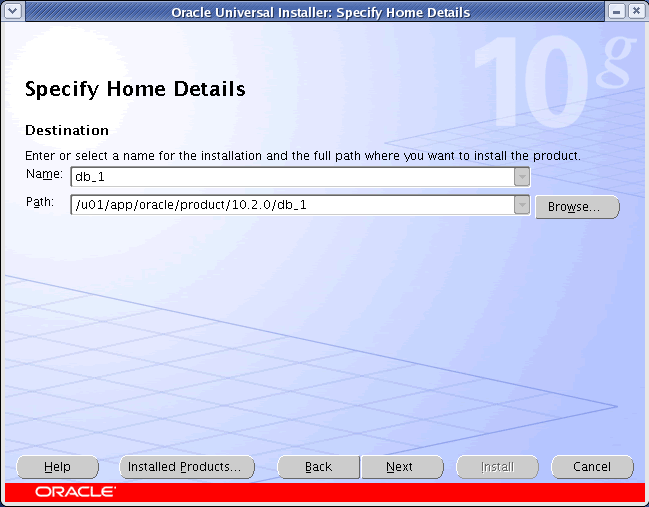
During the installation enter the appropriate ORACLE_HOME and name then continue installation. For a more detailed look at the installation process, click on the links below to see screen shots of each stage../runInstaller
- Select Installation Method
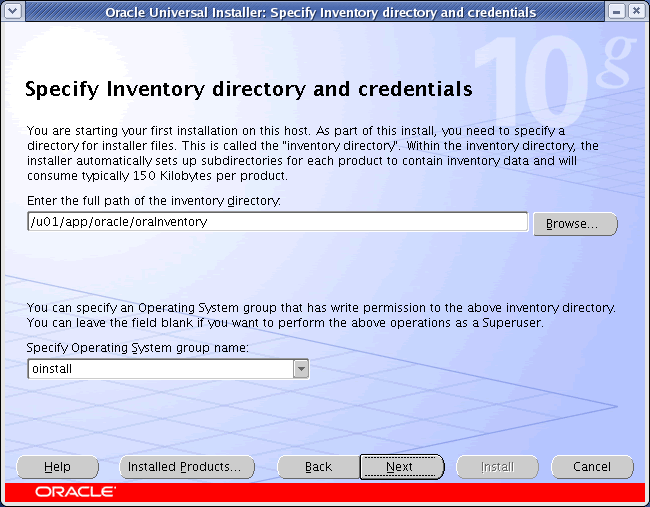
- Specify Inventory Directory and Credentials
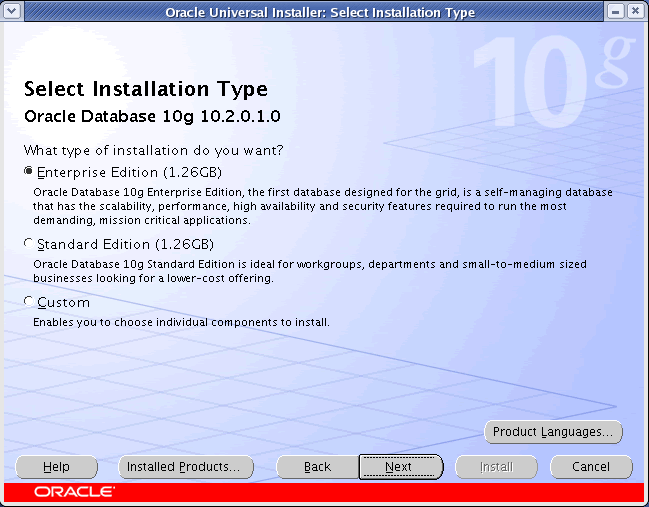
- Select Installation Type
- Specify Home Details
- Product-Specific Prerequisite Checks
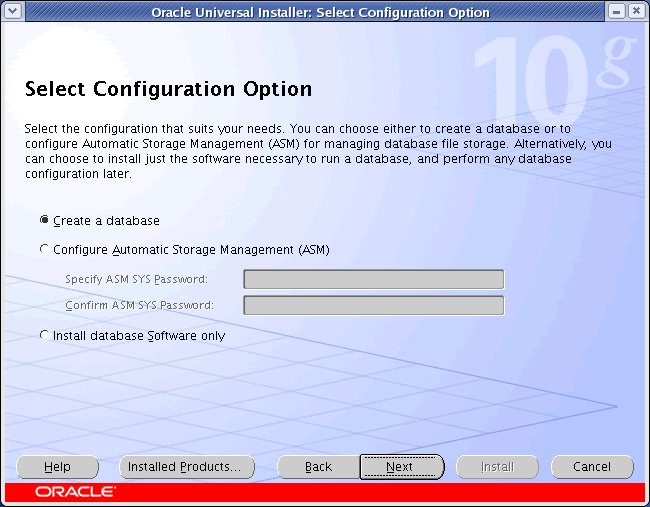
- Select Configuration Option
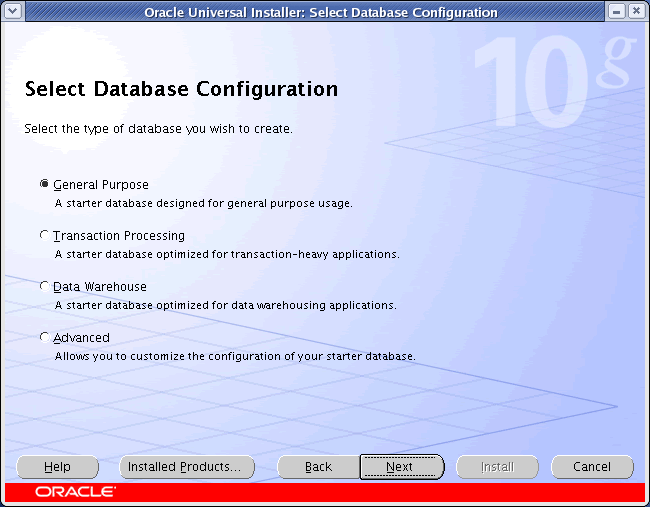
- Select Database Configuration
- Specify Database Configuration Options
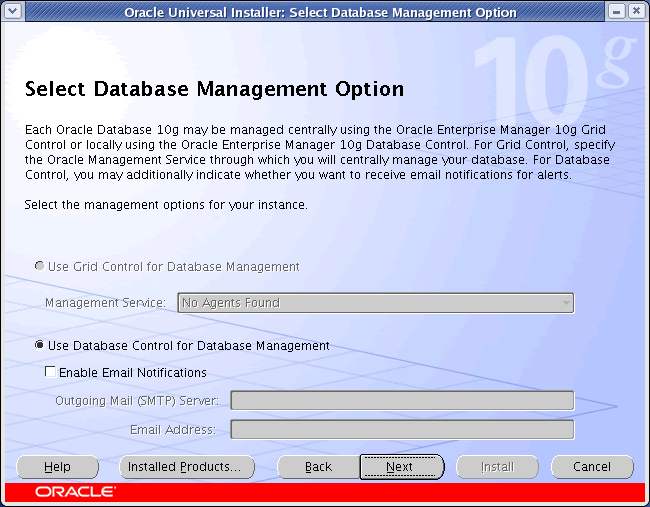
- Select Database Management Option
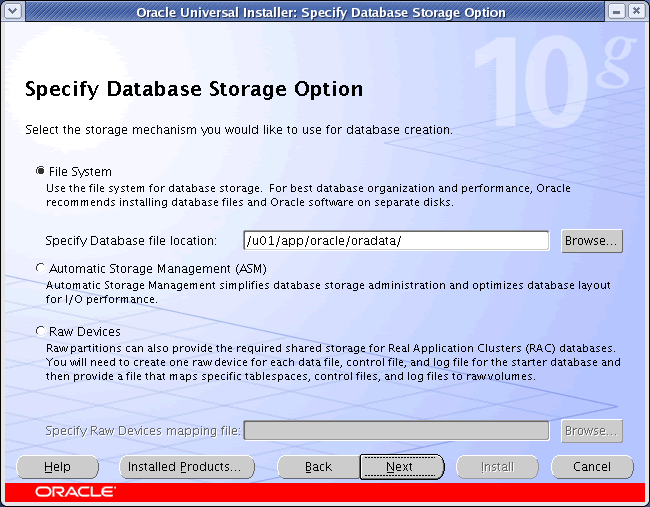
- Specify Database Storage Option
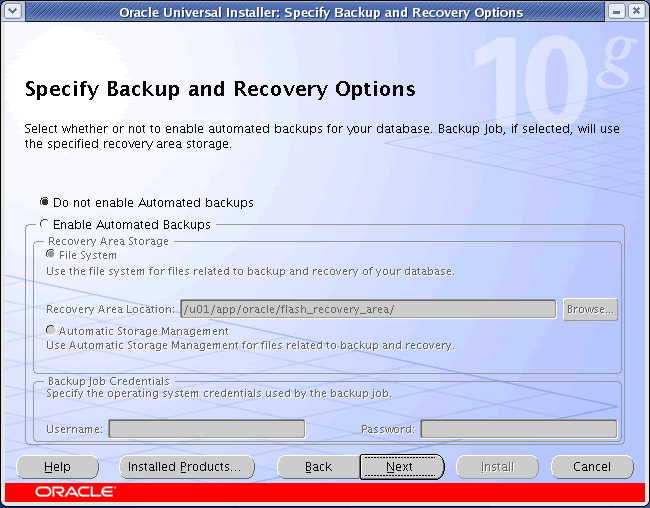
- Specify Backup and Recovery Options
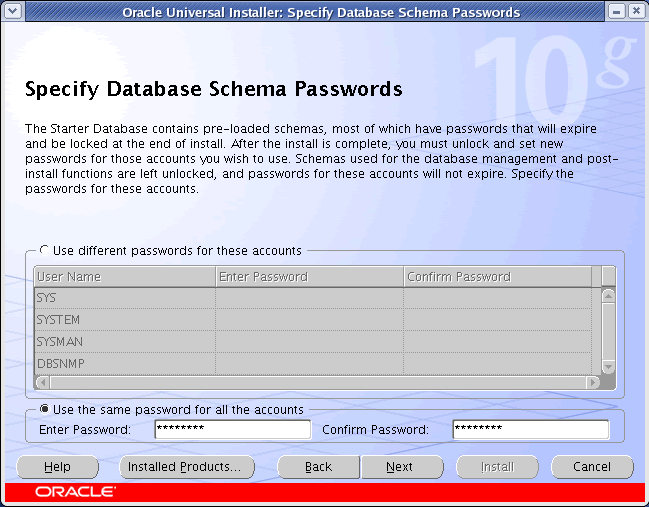
- Specify Database Schema Passwords
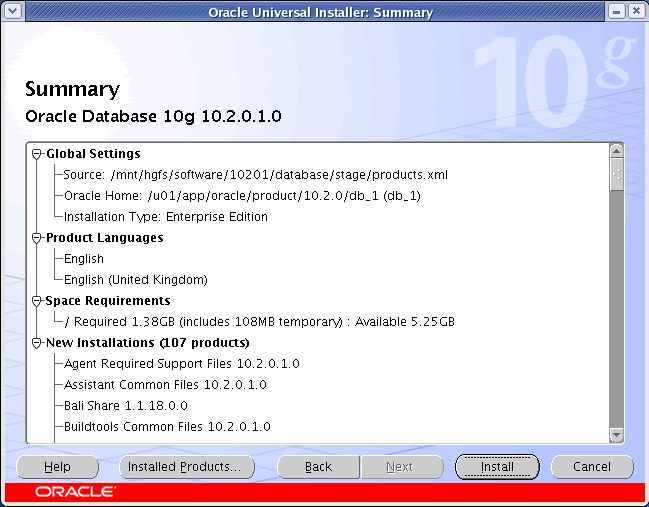
- Summary
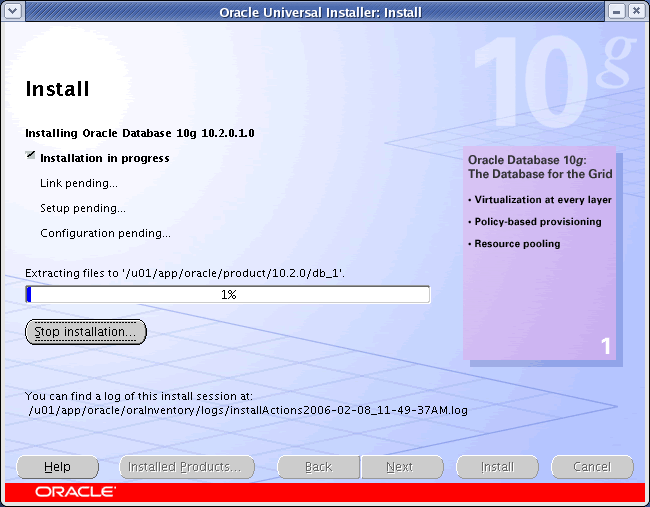
- Install
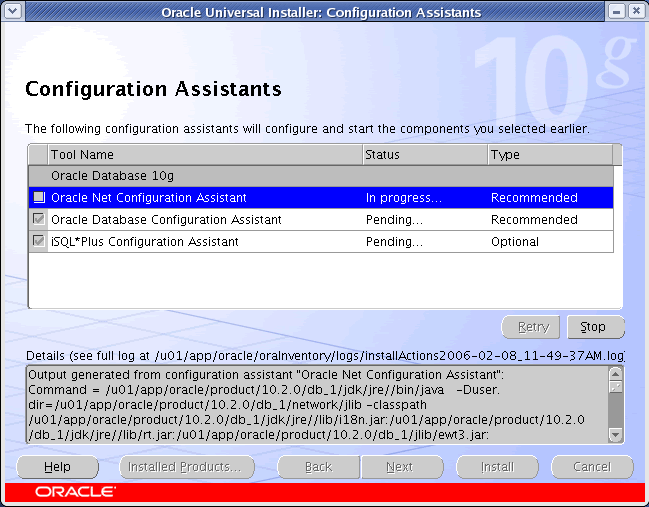
- Configuration Assistants
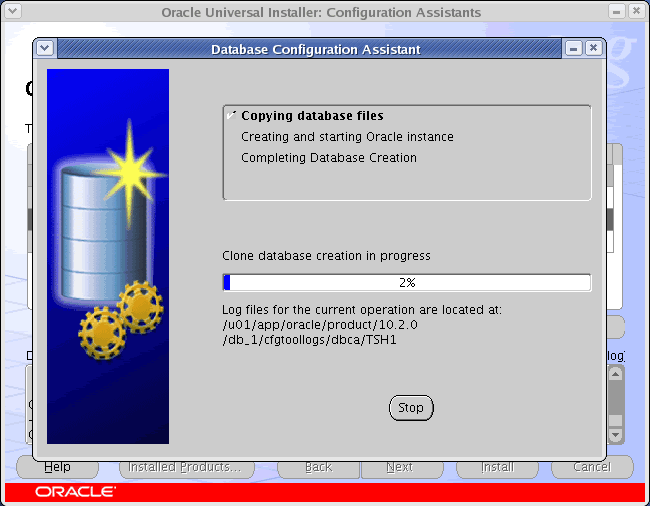
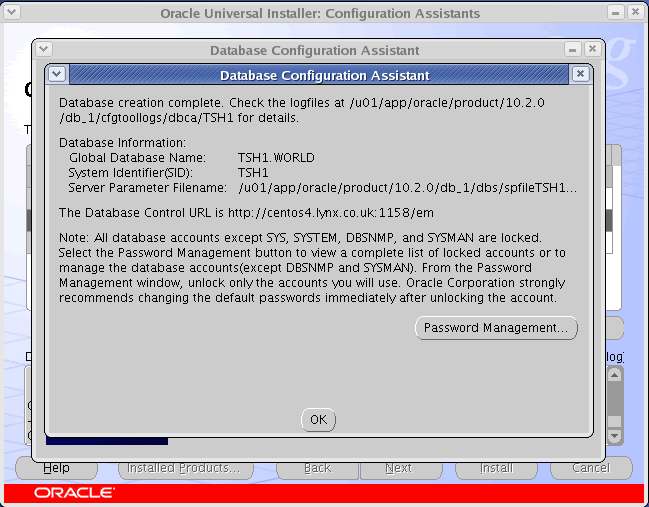
- Database Configuration Assistant
- Database Configuration Assistant Password Management
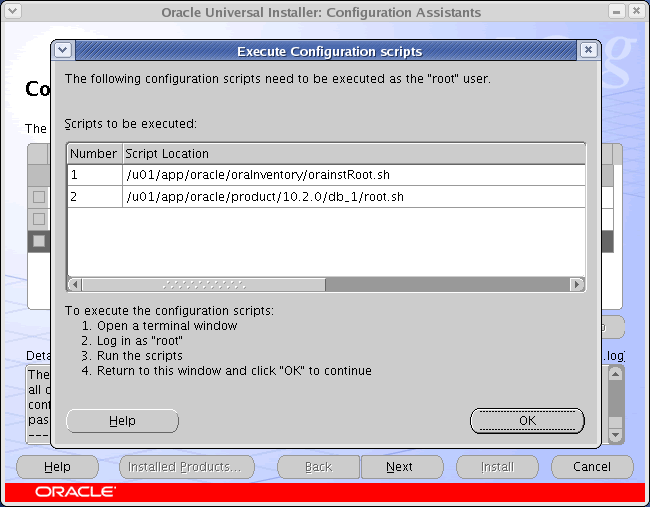
- Execute Configuration Scripts
- End Of Installation
Post Installation
Edit the /etc/redhat-release file restoring the original release information:Edit the /etc/oratab file setting the restart flag for each instance to 'Y':Red Hat Enterprise Linux Server release 5 (Tikanga)
For more information see:TSH1:/u01/app/oracle/product/10.2.0/db_1:Y
- Installation Guide for Linux x86 (10.2)
- Installing Oracle Database 10g Release 1 and 2...
- Automating Database Startup and Shutdown on Linux
Back to the Top.
No comments:
Post a Comment
leave your message if you need help ...